How to Make a Better Hologram – Part 1
 Making holograms is a real “Wow!” moment. When you make your first hologram, there is something magical about seeing how science and art can combine to create something so mesmerizing. But now that you’ve learned how to make a hologram, you want to take the next step and learn how to make better holograms!
This is Part 1 in a series we’ll be doing on how to make better holograms. Each part in the series will discuss one of our advanced hologram-making tips and tricks that we’ve learned from making holograms with the Hologram Kit over the last 15 years. We can’t wait to share some of our secrets with you, so read on.
The Secret “Fill Light”
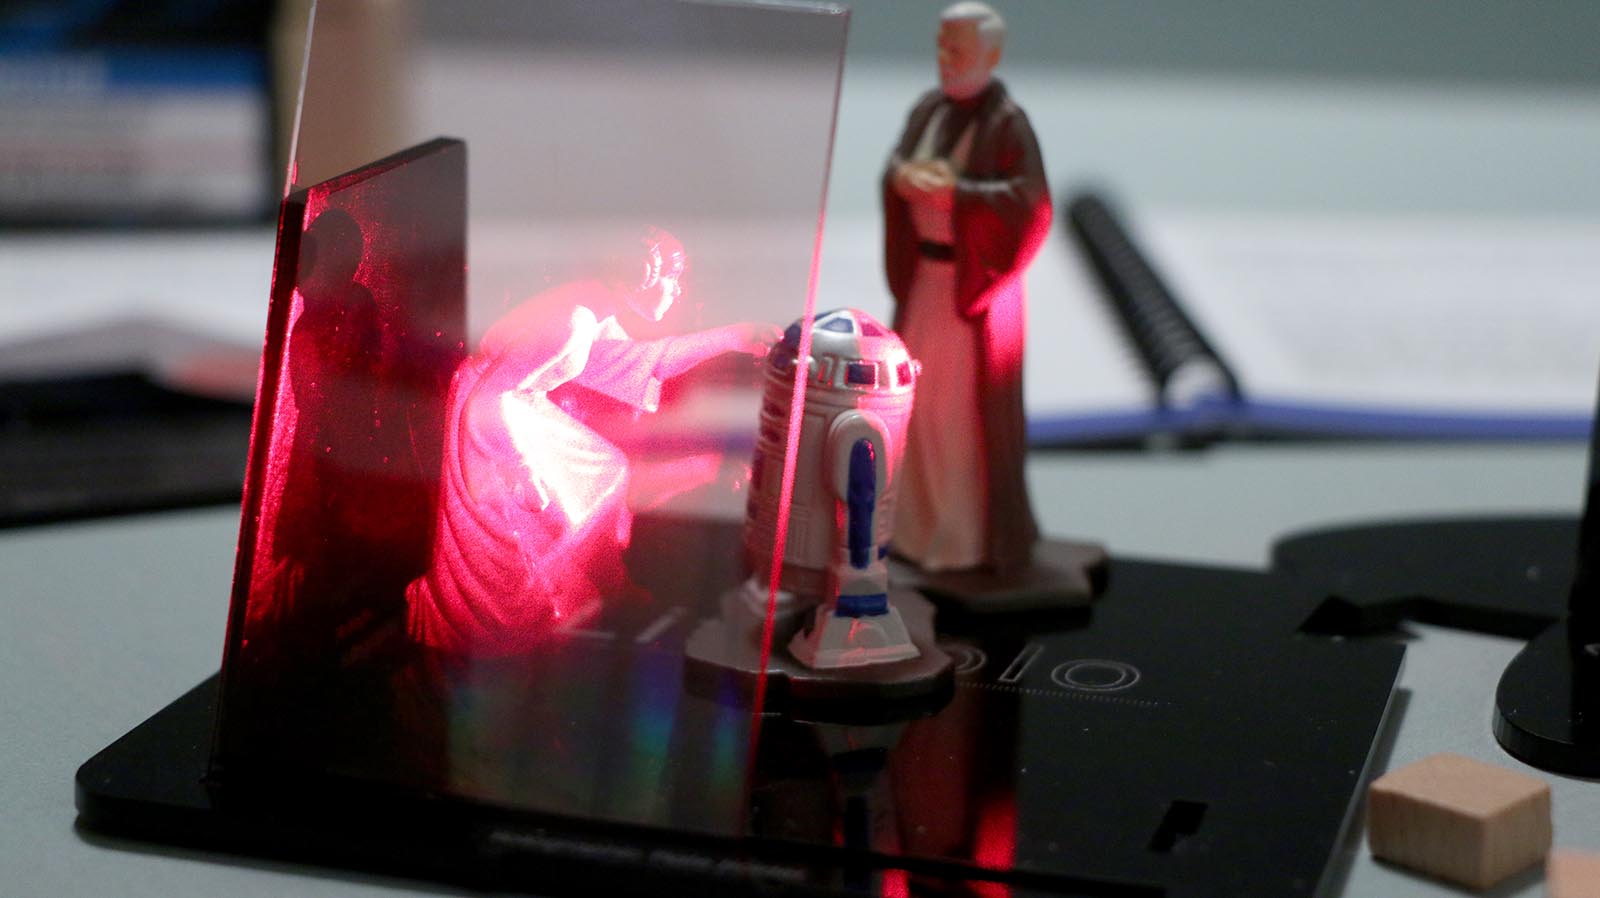
Object lighting is a big key to making a good hologram. But you may not know that there is an additional lighting element that can make your holograms better, and it’s already built into the Hologram Kit setup.
All holograms need two laser beams to make the required interference pattern for a hologram: the “reference beam” and the “object beam”. Even though the basic layout for the Hologram Kit is called a single-beam hologram, part of that beam is hitting the object and reflecting off to the film plate (the object beam) and part is going directly to the surface of the film plate (the reference beam).
If you set up the Hologram Kit with your object in place (we like to use Princess Leia, of course), you can see the object beam light hitting the object.

Notice that most of the object light is coming from the side because of the layout for making the hologram and the position of the laser. A good part of the front of the object does not have any light hitting it, and as a result, there is no object information for this part of the object. You’ll still get a good hologram, but remember, we want better holograms!
Here’s the secret: when the film plate is in place for an actual hologram exposure, there is reflected light off the film plate that adds extra object beam lighting. Below we placed a blank plate in position with the same Princess Leia object, but notice how much more light is now illuminating the front of the object.

This “secret fill light” will illuminate areas of the object that could not be illuminated directly from the laser, and will improve the lighting of the object, making a much better final hologram.
Now You See It, Now You Don’t

You can see from the side-by-side version above just how much extra fill light can be added if you know this trick for using the reflected light from the film plate. But there are a few tips for getting the most out of this technique:
- To visualize the extra fill light, use a blank film plate to be able to see the reflected light and how it is illuminating new parts of your object
- Try moving your object a little closer or a little further from the film plate. Sometimes if the object is too close, it can’t be reached by the reflected light from the film plate. To far, and it may be out of reach from the reflected light.
- The reflected light is more sensitive to movement and vibration than the primary light hitting the object, so make sure everything is stable and settled. Remember, the light reflecting off the film plate travels from the laser to the film plate, then to the object (adding fill light), and then BACK AGAIN to the film plate. Any relative motion between the film plate and the object will make this light disappear in the hologram (technically, deconstructively interfered).
- For good stability of the plate, place your film plate in the Holographic Plate Holder slot straight up and down, and then let it fall back into the leaning position against the Plate Support with a nice “thunk”. This is a good indicator that your film plate will be sitting solidly for the exposure.
- You can also add more “settling time” after you place the film plate in position and before the exposure, to let the setup “relax” and get rid of any “stress” areas and let them reach steady state. There are some very technical things happening here, but seriously, who wouldn’t make betting holograms when they are given time to relax and get rid of stress! 10 minutes is usually plenty of settling time for most situations.
Hope you enjoyed this tip for how to make a better hologram. Be on the lookout for Part 2 of the series, coming soon.
I want to make a hologram of falling rain with the litiholo kits. how is this done. I want it for my railroad club across a 6 foot area.