Reflection Holograms – Viewing holograms in sunlight or with a smartphone
Holograms are amazing to look at! How can a flat piece of film create images that have such depth? You can literally “look around” the captured image and see different sides from different angles, even seeing areas that were hidden from a different direction. And while most holograms are made with laser light, capturing and replaying the full 3D image wavefront, did you know that some holograms can be viewed with an ordinary spot light or even sunlight?
Reflection Holograms
Reflection holograms are a special category of holograms that are visible using what is often referred to as “white light”. While they are still created with laser light, the structure of the captured holograms allows them to also be viewed without a laser, using more ordinary light sources. Sunlight or a spot light are the best for viewing these holograms, as they are brighter and clearer with a source that is more “directional”. Diffuse lighting (cloudy days or big fluorescent lighting panels) will still show an image, but the lack of “directionality” means the hologram is trying to create a replay image for every point on the source, and the result gets less clear for images that are deeper.
Let’s Get Technical
From a technical standpoint, the holograms that are only laser viewable are often called “transmission” holograms. The laser light for replaying the images comes from the back of the hologram and the resulting image wavefront is transmitted through the film to be viewed from the front. For these holograms, the captured interference pattern of light forms “fringes” recorded in the film that are oriented perpendicular to the film’s surface. These recorded fringes are great at creating diffracted images that reconstruct the original wavefront, but they are very poor at filtering different wavelengths (or colors) of light, so replaying these holograms with white light creates a significant chromatic blur.
On the other hand, “reflection” holograms have the light source coming from the front side of the holograms, with the reconstructed image “reflecting” back off the surface of the film. Reflection holograms capture a laser light interference pattern very similar to transmission holograms, but the recorded fringes are oriented parallel to the surface of the film. As a result, the fringes are almost like multiple layers within the film that can filter out different wavelengths, and only replay the colors needed for the image, allowing the non-diffracted colors to simply pass through the film unaffected. Thus a white light illumination source like a spot light or even sunlight can replay clear images (and even full-color images).
(There is another category of holograms called Rainbow Holograms, which were invented by Stephen Benton, and are almost a hybrid between transmission and reflection holograms. We’ll do another post some time about that!)
Viewing holograms with a smartphone
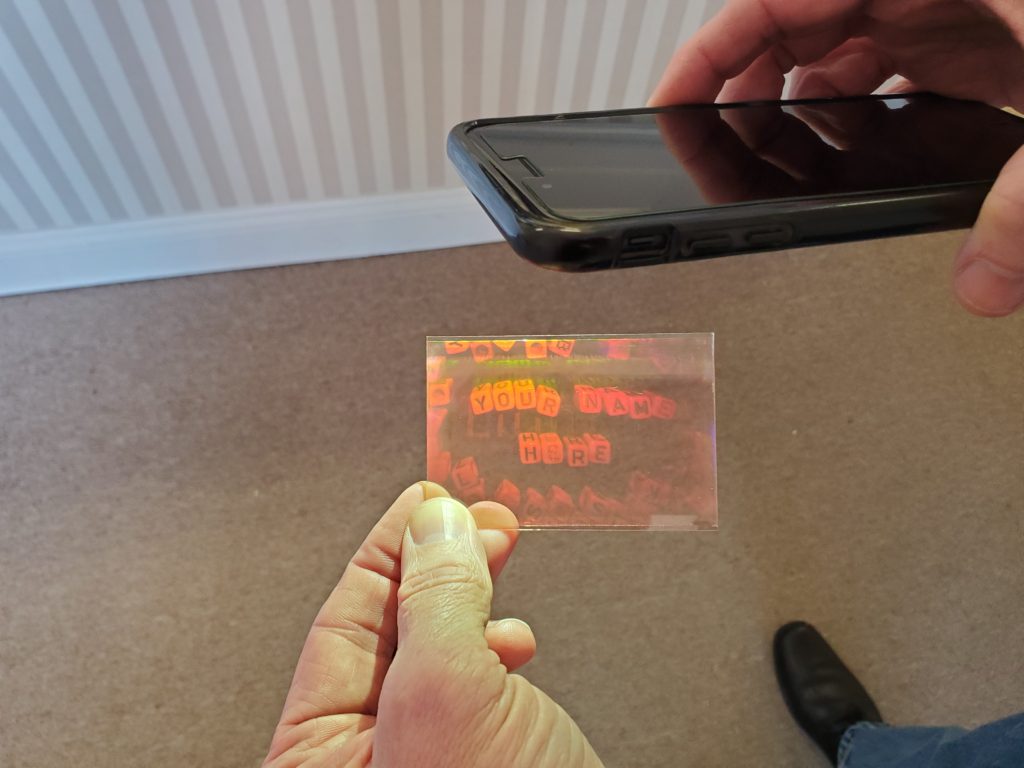
A really exciting way we use to show off our reflection holograms at LitiHolo is to use the flashlight built into every smartphone. Turn on the flashlight app on your smartphone and hold it in one hand with the hologram in your other hand. Hold the hologram facing directly toward you, and hold the light a few inches above the hologram, shining down onto the hologram at an angle onto the front surface from above. Tip the hologram slightly to see the different perspectives, and to look around objects in the captured image.
When viewing reflection holograms with sunlight or other light sources, you will need to be more aware of the brighter background areas that are visible when looking at your hologram, as the ambient light can make the hologram images appear less bright. You can try putting a black background behind the hologram to help create good contrast. Our preferred choice is to use a black piece of acrylic behind the reflection hologram during viewing. However you can get good bright images even without any backing.
Other good illumination sources for reflection holograms include direct sunlight, spot lights, track lighting, can lights, flashlights, and even a bare light bulb.
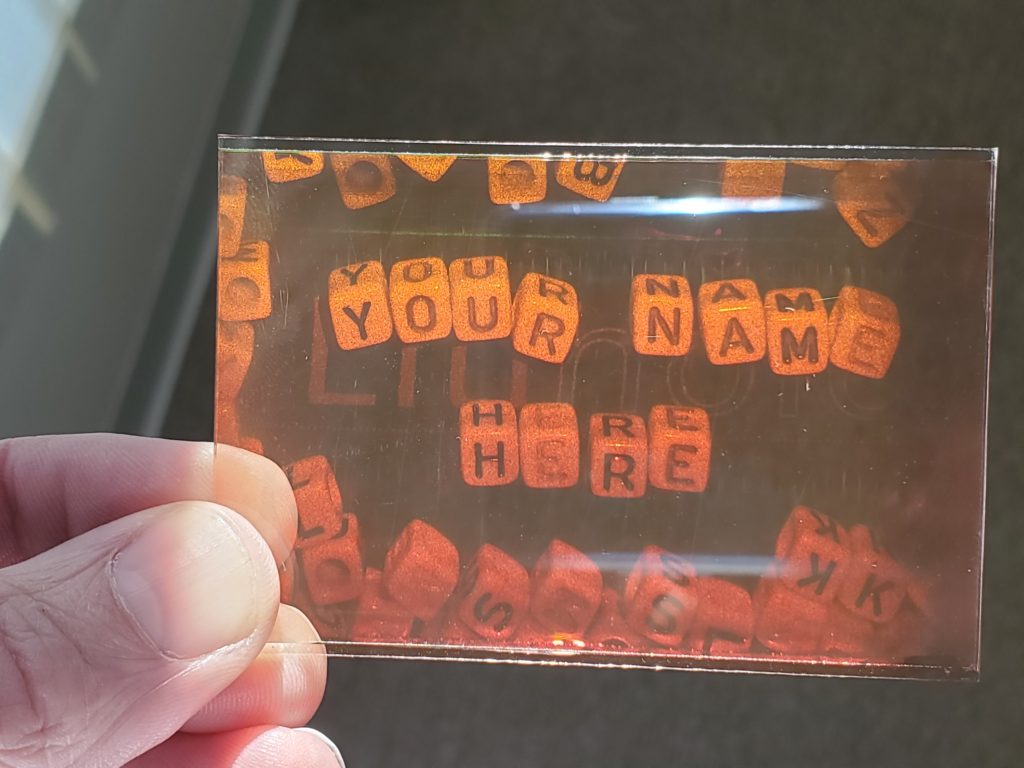
How we made our reflection hologram
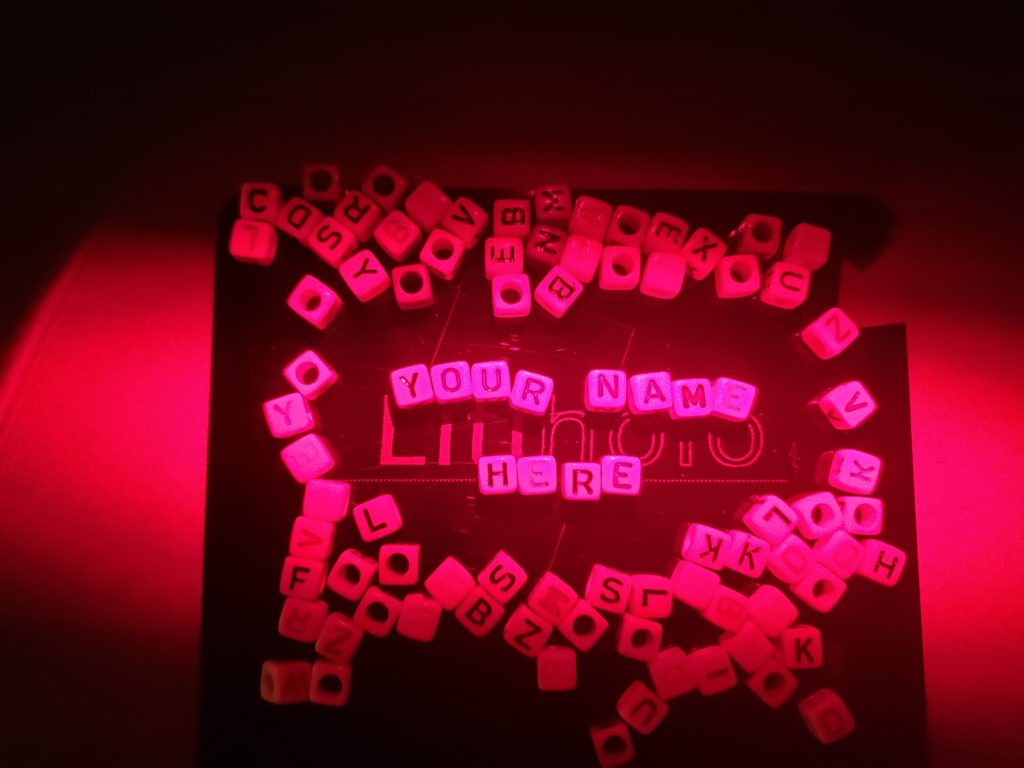
To make the hologram in the image above, we used our LitiHolo Hologram Kit and the Reflection Hologram Upgrade Kit. We took the letter beads for the hologram and arranged them laying flat on the Holographic Plate Holder surface, and then placed the hologram film plate directly on top of the letter beads. The laser light hits directly onto the film plate (this is called the “reference beam”), and then the light passing through the film hits the letter beads below and reflects back to the film (this is the “object beam”). The resulting interference pattern from the interaction of the reference beam and object beam is captured in the film (the self-developing film records and develops the image simultaneously).
The exposure took about 4 minutes. When finished, we simply lifted up the film plate off the letter beads to view the final hologram. When illuminated in the laser light, the reflection hologram can look incredibly realistic, and we’ve had times when people viewing the holograms thought the objects were still really there. When the hologram is viewed with a spot light or with sunlight, the resulting image is amazingly transparent but fully 3D at the same time.
Show us your reflection holograms
If you make some nice reflection holograms, please send them to hologram-videos@litiholo.com or info@litiholo.com, and we will post selected images in our Users section on our Gallery page.
Note: The 4″x5″ Hologram Upgrade Kit and the new 6″x8″ Hologram Upgrade Kit have both transmission and reflection hologram setups included.
Pingback: What Makes Something Holographic? – Almazrestaurant
Pingback: Why Are Holograms Important? – Almazrestaurant
I’m trying, but it doesn’t work. I’m using the reflection upgrade kit and the cr20film, eany tip?
One tip is to try something simple, reflective, and close to the film to start. Try using a coin and place the film right on top of it, similar to the description above. Make sure the film sits very stable (no wobbling as it sits on the coin). Once you’ve had success with something simple, you can start getting more complex.
I can’t see it with the Sun, only with a laser
Make sure you hold the hologram so that the sun is coming from the same direction that the laser was originally coming from. Tip the hologram up and down to catch the right angle where the hologram lights up. You can also try using your cell phone light as well, but again it needs to come from the same direction and angle as the original laser light. If you still have trouble, send an e-mail to info@litiholo.com. Thanks.
I still working on it, I tried 12 plates diferentes. And I can’t see it, they look great at the laser beam, fantastic but with a light source, my phone or a lamp really poor. What’s can I do to increase the brightness? More exposure time? I’ve use above 10 minutes. May by less…? A brighter laser? I m using the one from the upgrade kit 20
Glad to hear you are getting good holograms with the laser light! That means you are well on your way. Go ahead and send an e-mail to info@litiholo.com with a picture of one of your laser illuminated holograms, and we’ll try to help you further. Thanks.
Video please…
Pingback: Rise to Hologram Pro Status: How to Make BIGGER and BETTER Holograms! | Litiholo - Blog
I am a passionate first-year student fascinated by holograms and I need advice on where and how to begin (please note that I would like to purchase your kit).